In this article, you’ll learn how to set up and customize the About Page of the News 25 Pro theme, This guide will help you configure these settings to align with your site’s branding and functionality needs.
Before proceeding, ensure you’re logged into your WordPress Dashboard.
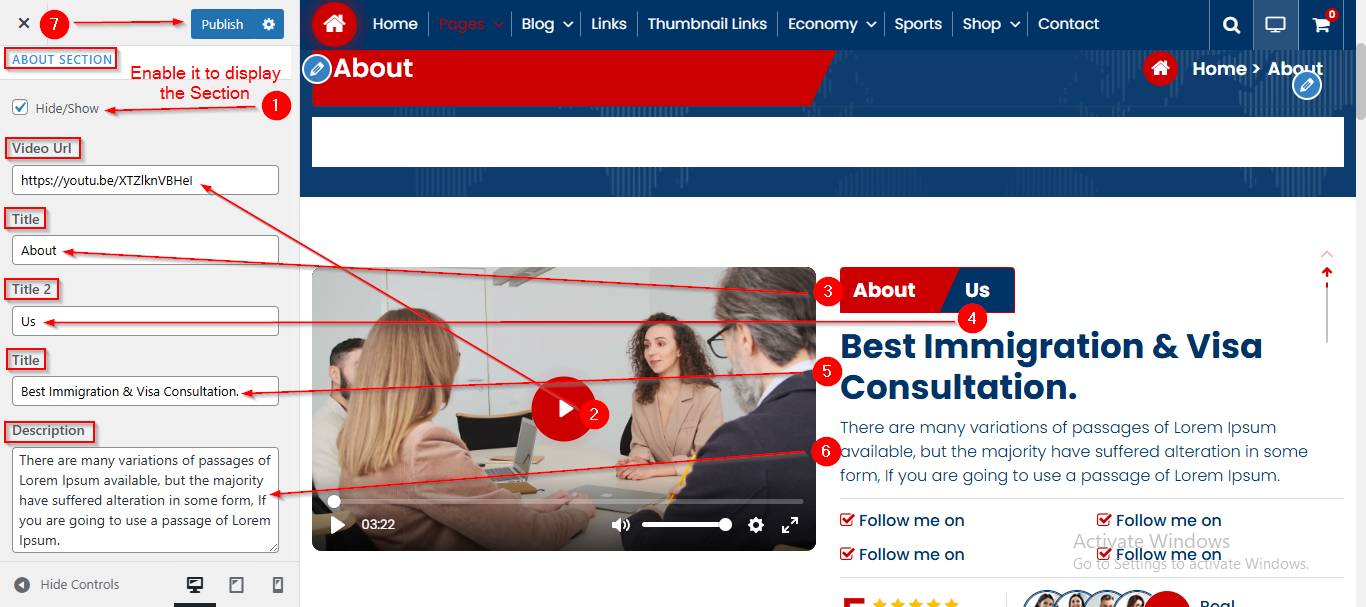
To manage the Video URL , Title and Description in About Section, follow these steps :
- From the WordPress Dashboard, navigate to Appearance > Customize.
- On the Customizer page, go to Page Templates > About Page.
- From here, enter the Video URL , Title , Title 2 , Title and Description.
- Click Publish when you’re done.
Note: Ensure the checkbox labeled Hide/Show Section is checked if you want to display the Section.
Before proceeding, ensure you’re logged into your WordPress Dashboard.
To manage the Avatar and Customer Text in About Section, follow these steps:
- From the WordPress Dashboard, navigate to Appearance > Customize.
- On the Customizer page, go to Page Templates > About Page.
- Scroll down until you see the Avatar Section.
- Open the Avatar toggle to manage the Avatar Image.
- In the Customer Text , Enter the text.
- Click Publish when you’re done.
![]()
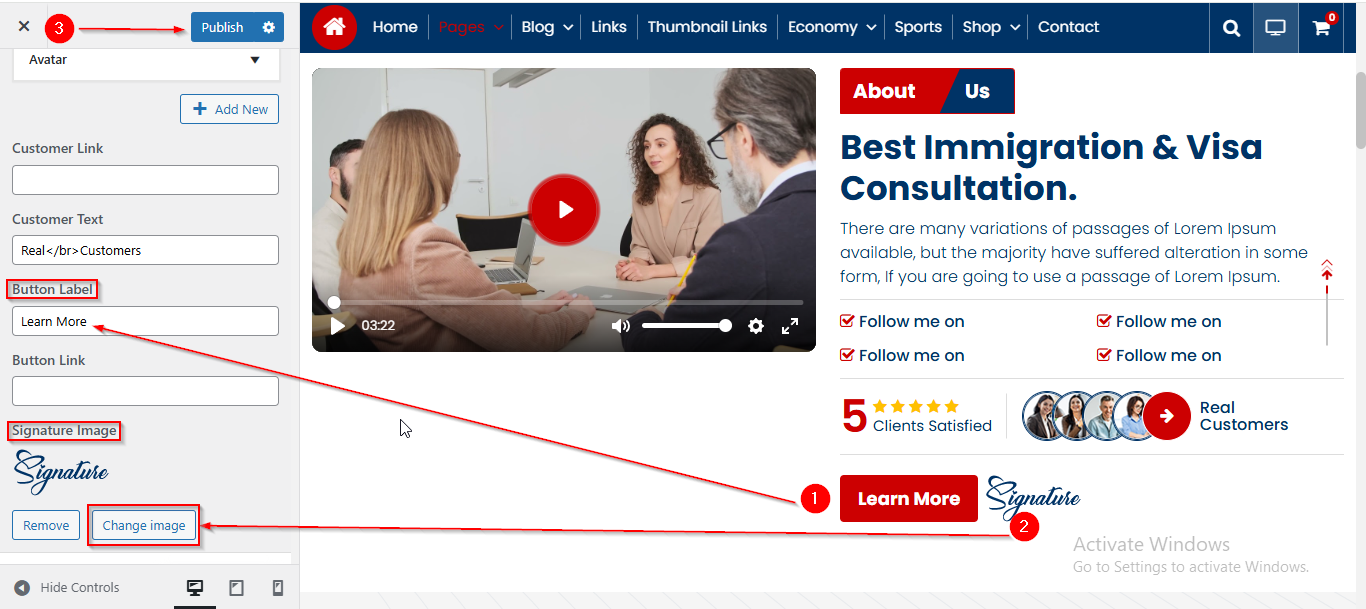
Before proceeding, ensure you’re logged into your WordPress Dashboard.
To manage the Button and Signature Image in About Section, follow these steps:
- From the WordPress Dashboard, navigate to Appearance > Customize.
- On the Customizer page, go to Page Templates > About Page.
- Scroll down until you see the Button Label .
- Here enter the Button Label.
- From the Signature Image choose the Image.
- This is where you can manage the counter content, including the values and labels displayed.
- Click Publish when you’re done.
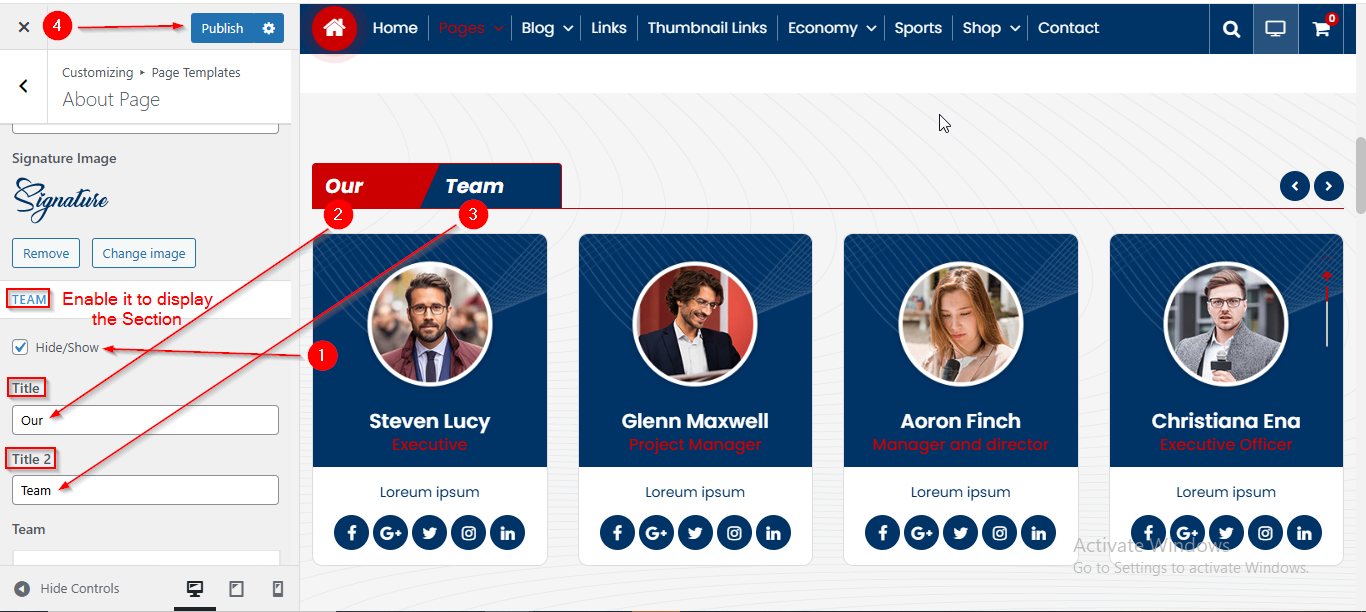
Before proceeding, ensure you’re logged into your WordPress Dashboard.
To manage the Title and Title 2 in Team Section, follow these steps:
- From the WordPress Dashboard, navigate to Appearance > Customize.
- On the Customizer page, go to Page Templates > About Page.
- Scroll down until you see the TEAM Section.
- Enter the Title , Title 2 of your choice.
- Click Publish when you’re done.
Note: Ensure the checkbox labeled Hide/Show Section is checked if you want to display the Section.
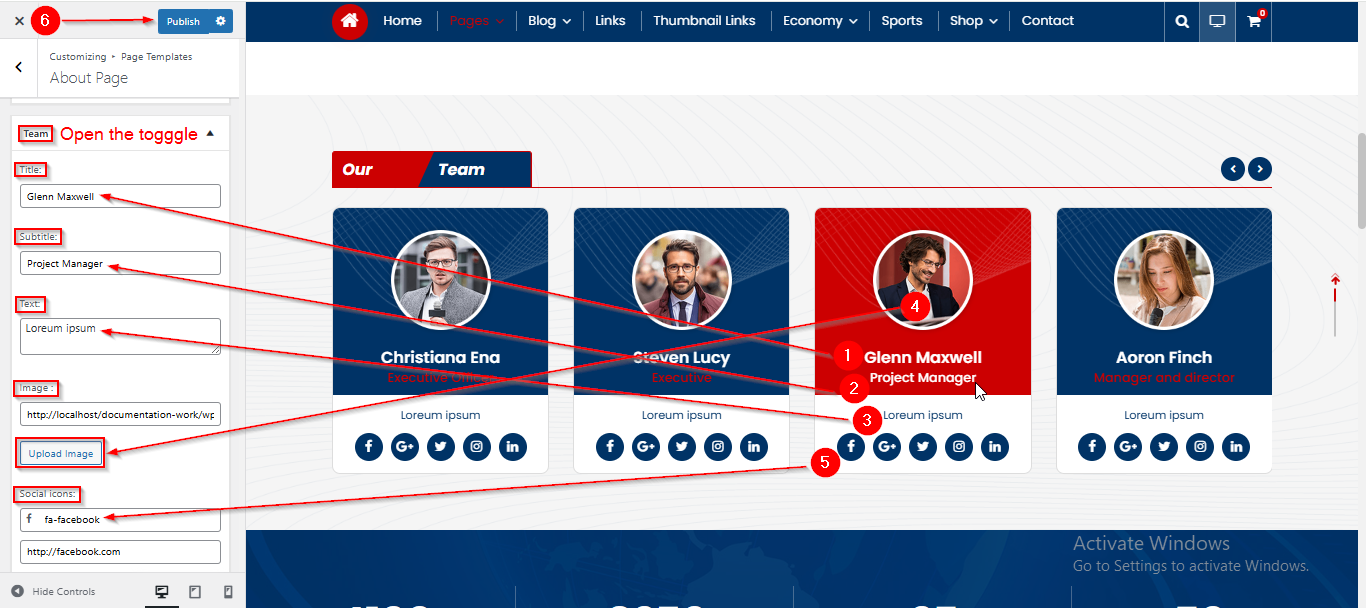
Before proceeding, ensure you’re logged into your WordPress Dashboard.
To manage the Team Content in Team Section, follow these steps:
- From the WordPress Dashboard, navigate to Appearance > Customize.
- On the Customizer page, go to Page Templates > About Page.
- Scroll down until you see the Team Toggle.
- Open the toggle to manage the Team content such as Title , Subtitle , Text , Image and Social Icon.
- Click Publish when you’re done.
Before proceeding, ensure you’re logged into your WordPress Dashboard.
To manage the Funfact Content in Funfact Section, follow these steps:
- From the WordPress Dashboard, navigate to Appearance > Customize.
- On the Customizer page, go to Page Templates > About Page.
- Scroll down until you see the FUNFACT Section.
- Open the toggle to manage the Funfact content such as Title , Subtitle and Text
- Click Publish when you’re done.
Note: Ensure the checkbox labeled Hide/Show Section is checked if you want to display the Section.

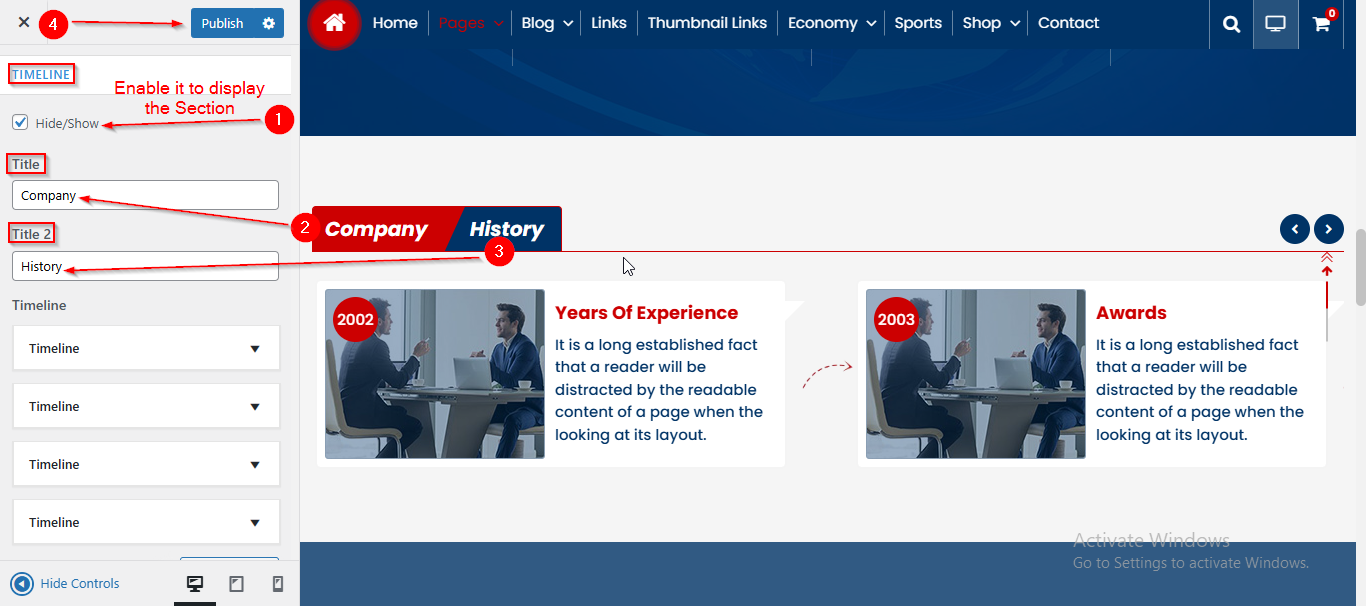
Before proceeding, ensure you’re logged into your WordPress Dashboard.
To manage the Section title and title 2 in Timeline Section, follow these steps :
- From the WordPress Dashboard, navigate to Appearance > Customize.
- On the Customizer page, go to Page Templates > About Page.
- Scroll down until you see the TIMELINE Section.
- Here you can manage the Section title and title 2
- Click Publish when you’re done.
Note: Ensure the checkbox labeled Hide/Show is checked if you want to display the Section.
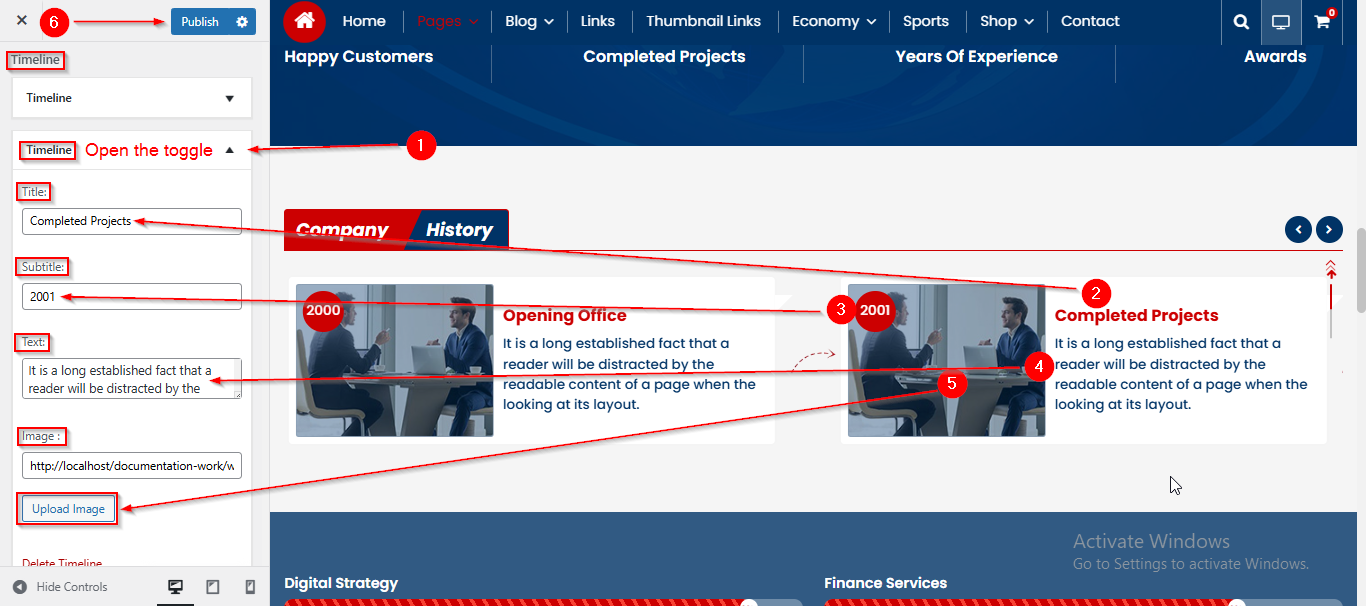
Before proceeding, ensure you’re logged into your WordPress Dashboard.
To manage the Timeline Content in Timeline Section, follow these steps:
- From the WordPress Dashboard, navigate to Appearance > Customize.
- On the Customizer page, go to Page Templates > About Page.
- Scroll down until you see the Timeline toggle.
- Open the toggle to manage Timeline content such as Title , Subtitle and Text.
- Click Publish when you’re done.
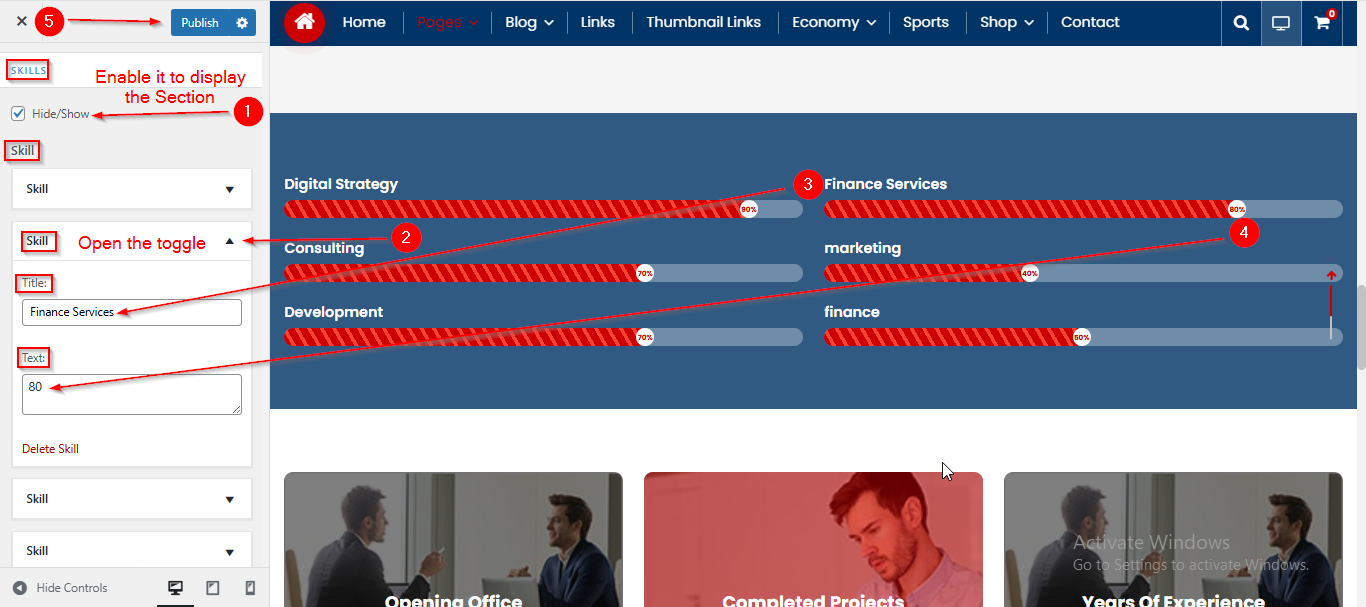
Before proceeding, ensure you’re logged into your WordPress Dashboard.
To manage the Skill Content in Skill Section, follow these steps:
- From the WordPress Dashboard, navigate to Appearance > Customize.
- On the Customizer page, go to Page Templates > About Page.
- Scroll down until you see the SKILLS Section.
- Here open the Skill toggle to manage the Skill Content such as title and text.
- Click Publish when you’re done.
Note: Ensure the checkbox labeled Hide/Show is checked if you want to display the Section.
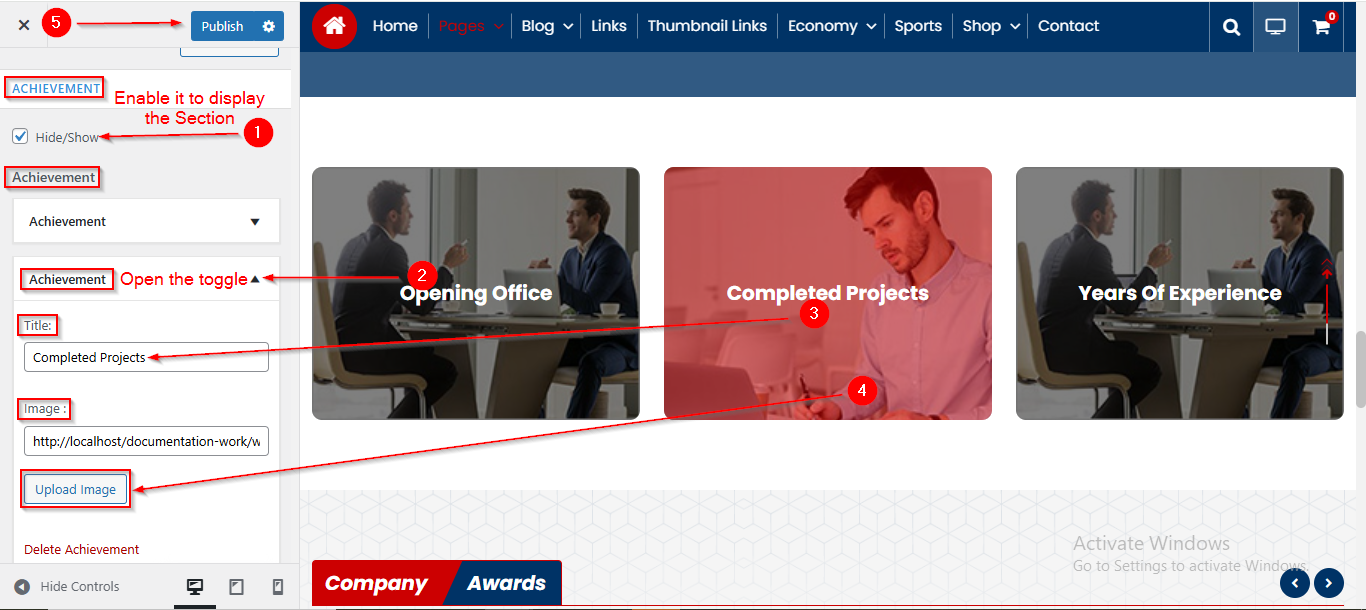
Before proceeding, ensure you’re logged into your WordPress Dashboard.
To manage the Achievment Content in Achievement Section, follow these steps:
- From the WordPress Dashboard, navigate to Appearance > Customize.
- On the Customizer page, go to Page Templates > About Page.
- Scroll down until you see the ACHIEVEMENT Section.
- Here open the Achievement toggle to manage the Achivement content such as Title and Image.
- Click Publish when you’re done.
Note: Ensure the checkbox labeled Hide/Show is checked if you want to display the Section.
Before proceeding, ensure you’re logged into your WordPress Dashboard.
To manage the Company Award Title and Title 2 in Awards Section, follow these steps:
- From the WordPress Dashboard, navigate to Appearance > Customize.
- On the Customizer page, go to Page Templates > About Page.
- Scroll down until you see the AWARDS Section.
- From the Title and Title 2 option enter the Title.
- Click Publish when you’re done.
Note: Ensure the checkbox labeled Hide/Show is checked if you want to display the Section.

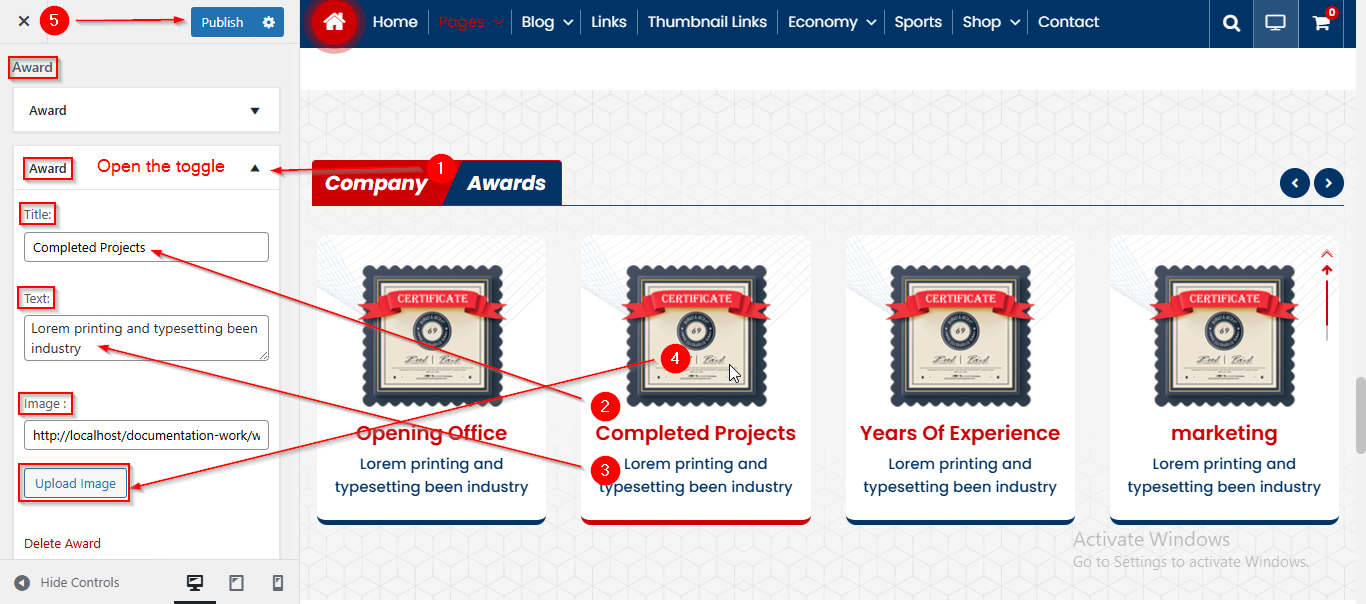
Before proceeding, ensure you’re logged into your WordPress Dashboard.
To manage the Award Content in Award Section, follow these steps:
- From the WordPress Dashboard, navigate to Appearance > Customize.
- On the Customizer page, go to Page Templates > About Page.
- Scroll down until you see the Award toggle.
- Open the toggle to manage the Title , Text and Image
- Click Publish when you’re done.
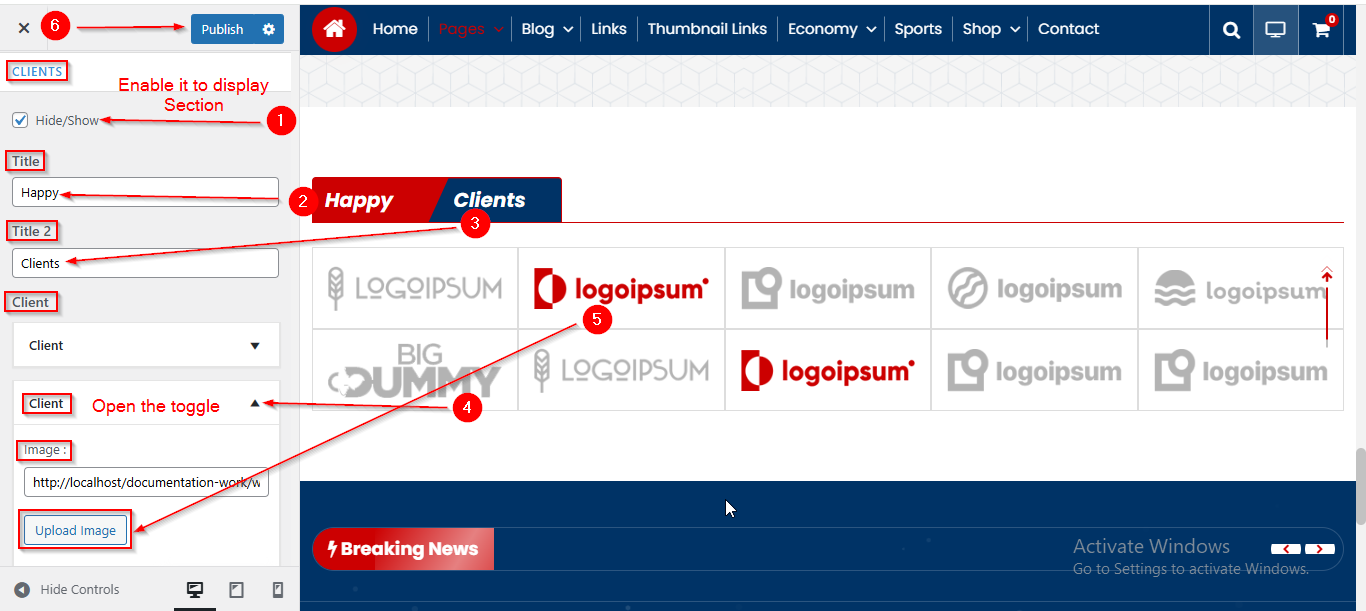
Before proceeding, ensure you’re logged into your WordPress Dashboard.
To manage the Title , Title 2 and Client Content in Client Section, follow these steps:
- From the WordPress Dashboard, navigate to Appearance > Customize.
- On the Customizer page, go to Page Templates > About Page.
- Scroll down until you see the CLIENTS SECTION.
- From the Title and Title 2 option you can manage the Title and Title.
- Open the Client Toggle to manage the Client Image.
- Click Publish when you’re done.
Note: Ensure the checkbox labeled Hide/Show is checked if you want to display the Section.